
Unlocking Amazon's Treasure Trove of Data: A Guide to Building a Data Extraction Bot with Node.js
Have you ever found yourself needing a deep understanding of a product market? Whether you're launching software and need pricing insights, seeking a competitive edge for your existing product, or simply looking for the best deals, one thing is sure: accurate data is your key to making informed decisions. And there's another common thread in these scenarios - they can all benefit from the power of web scraping.
Web scraping is the art of automating data extraction from websites using software. It's essentially a way to replace the tedious "copy" and "paste" routine, making the process less monotonous and significantly faster, too – something a bot can achieve in seconds.
But here's the big question: Why would you want to scrape Amazon's pages? You're about to discover the answer. However, before we dive in, it's essential to clarify one thing: While scraping publicly available data is legal, Amazon does have measures to protect its pages. Therefore, it's crucial always to scrape responsibly, avoid any harm to the website, and adhere to ethical guidelines.
Why You Should Harvest Amazon Product Data
As the world's largest online retailer, Amazon is a one-stop shop for virtually anything you want to purchase, making it a goldmine of data waiting to be tapped.
Let's start with the first scenario. Unless you've invented a groundbreaking new product, Amazon offers something similar. Scraping these product pages can yield invaluable insights, including:
Competitors' Pricing Strategies: Gain insights into how your competitors price their products, enabling you to adjust your prices for competitiveness and understand their promotional tactics.
Customer Opinions: Explore customer reviews to understand your potential client base's priorities and find ways to enhance their experience.
Most Common Features: Analyze the features offered by competitors to identify critical functionalities and those that can be prioritized for future development.
Essentially, Amazon provides all the essential data for in-depth market and product analysis, equipping you to effectively design, launch, and expand your product offerings.
The second scenario applies to both businesses and individuals alike. The concept is similar to what was mentioned earlier. By scraping price, feature, and review data for various products, you can make an informed decision and choose the option that provides the most benefits at the lowest cost. After all, who doesn't love a good deal?
Not every product warrants this level of scrutiny, but the benefits are evident for significant purchases. Unfortunately, scraping Amazon comes with its fair share of challenges.
Navigating the Hurdles of Scraping Amazon Product Data
Not all websites are created equal, and as a general rule, the more intricate and widespread a website, the more challenging it becomes to scrape. As we previously highlighted, Amazon stands as the juggernaut of e-commerce, underscoring its immense popularity and its considerable complexity.
To begin with, Amazon is well aware of how scraping bots operate, and they have implemented countermeasures. Suppose a scraper follows a predictable pattern, sending requests at fixed intervals or with nearly identical parameters at a speed beyond human capacity. In that case, Amazon detects this behavior and promptly blocks the IP address. While proxies can circumvent this issue, they may not be necessary for our example since we will only scrap a few pages.
Moreover, Amazon intentionally employs diverse page structures for its products. In other words, if you inspect the pages of different products, you will likely encounter significant variations in their layout and attributes. This deliberate tactic forces you to adapt your scraper's code for each specific product system. Attempting to apply the same script to a new page type necessitates rewriting portions, making you work harder for the desired data.
Lastly, Amazon's vastness poses another challenge. If you aim to collect copious amounts of data, running your scraping software on a personal computer may prove excessively time-consuming for your requirements. This predicament is exacerbated by the fact that scraping too quickly will block your scraper. Therefore, if you seek substantial data swiftly, you'll need a robust scraping solution.
Enough dwelling on the obstacles—let's focus on solutions!
How to Create an Amazon Web Scraper
Let's keep things straightforward as we walk through the code. Feel free to follow along with the guide.
IDENTIFYING THE TARGET DATA
Imagine this scenario: you're planning to move to a new location in a few months and need to find new shelves to accommodate your books and magazines. You aim to explore all available options and secure the best possible deal. To kick things off, head to Amazon's marketplace, search for "shelves," and see what we can find.
You can access the search results and the page we'll be scraping via this [URL](insert Amazon URL here).
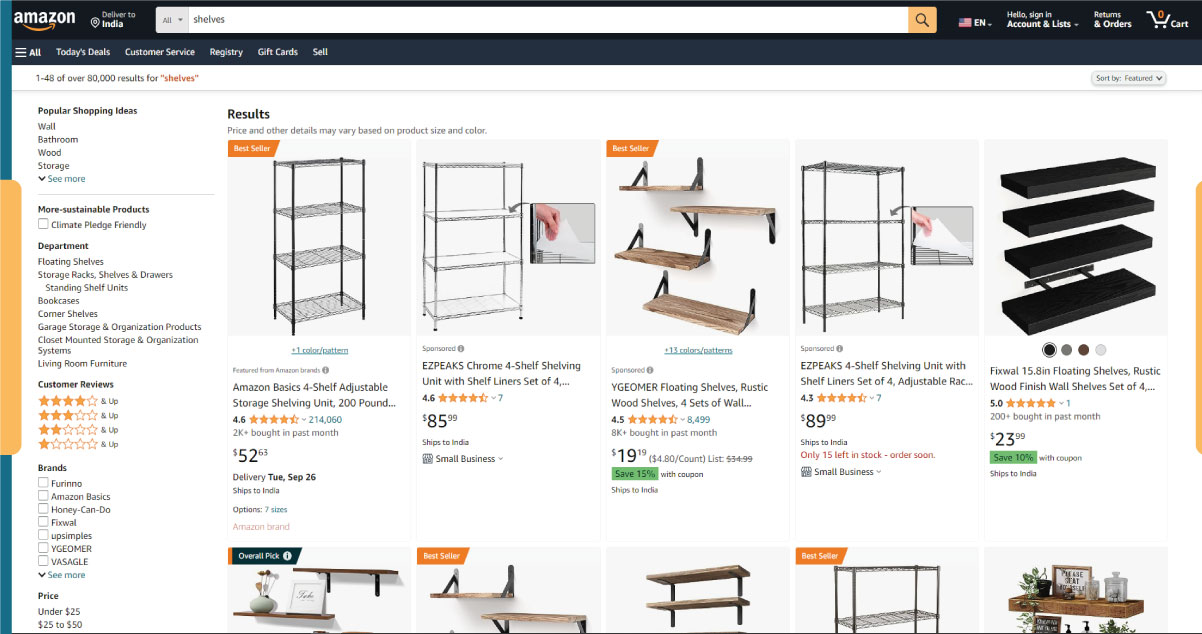
Let's take a moment to assess our current setup. A glance at the page reveals that we can readily gather information about:
- The appearance of the shelves
- The contents of the package
- Customer ratings
- Pricing
- Product links
- Suggestions for more affordable alternatives for some items
This is undoubtedly a wealth of data to work with!
PREPARING THE NECESSARY TOOLS
Before proceeding to the next step, let's ensure we have the following tools installed and configured:
1. Chrome: You can download it [here](insert Chrome download link here).
2. VSCode: Follow the installation instructions for your specific device found [here](insert VSCode installation link here).
3. Node.js: Before diving into the world of Axios and Cheerio, we must first install Node.js and the Node Package Manager (NPM). The simplest way to do this is by obtaining and running one of the installers from the official Node.js source.
Now, let's kickstart a new NPM project. Create a fresh folder for your project and execute the following command:
npm init -yTo set up the web scraper, we'll need to install some dependencies in our project, starting with Cheerio.
Cheerio
Cheerio is an open-source library that simplifies extracting valuable information by parsing HTML markup and offering an API for data manipulation. With Cheerio, we can select HTML elements using selectors like $("div"), which selects all < div > elements on a page. To install Cheerio, execute the following command within your project's directory:
npm install cheerioAxios
A JavaScript library employed for performing HTTP requests within Node.js.
npm install axiosEXAMINE THE PAGE SOURCE
In the upcoming steps, we will delve deeper into how the page's information is structured. Our objective is to understand what can be extracted from the source comprehensively.
Developer tools are invaluable for interactively navigating the website's Document Object Model (DOM). While we will be using Chrome's developer tools, feel free to utilize any web browser you're accustomed to.
To access these tools, right-click anywhere on the page and choose the "Inspect" option:
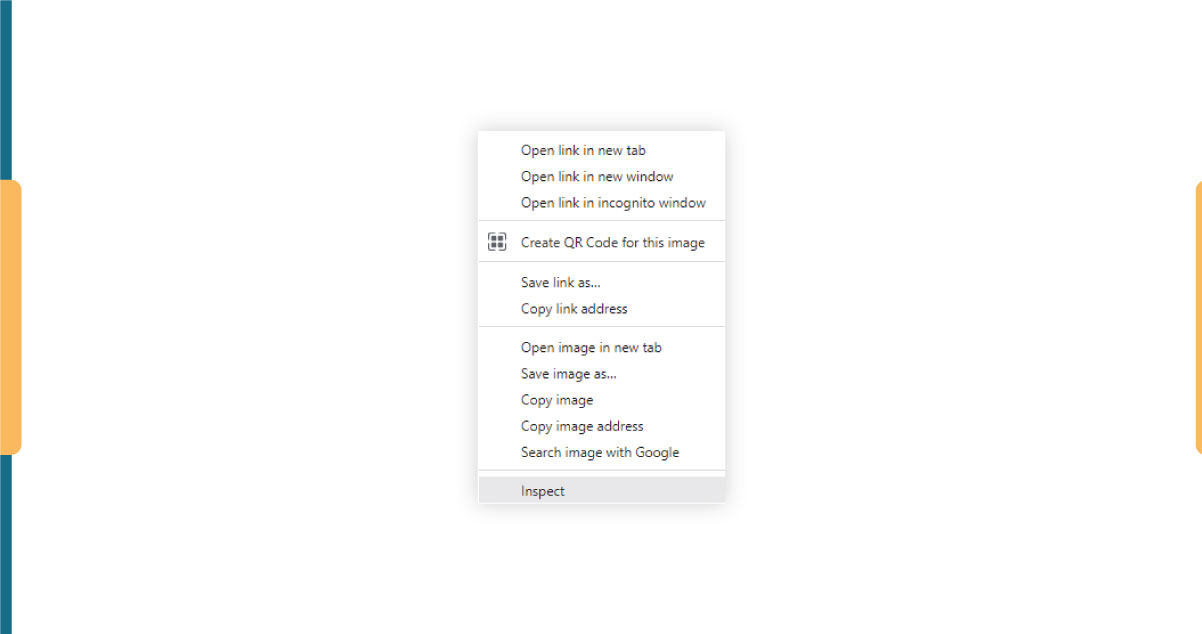
This action will initiate a new window displaying the page's source code. As mentioned, we aim to extract information about each shelf on the page.
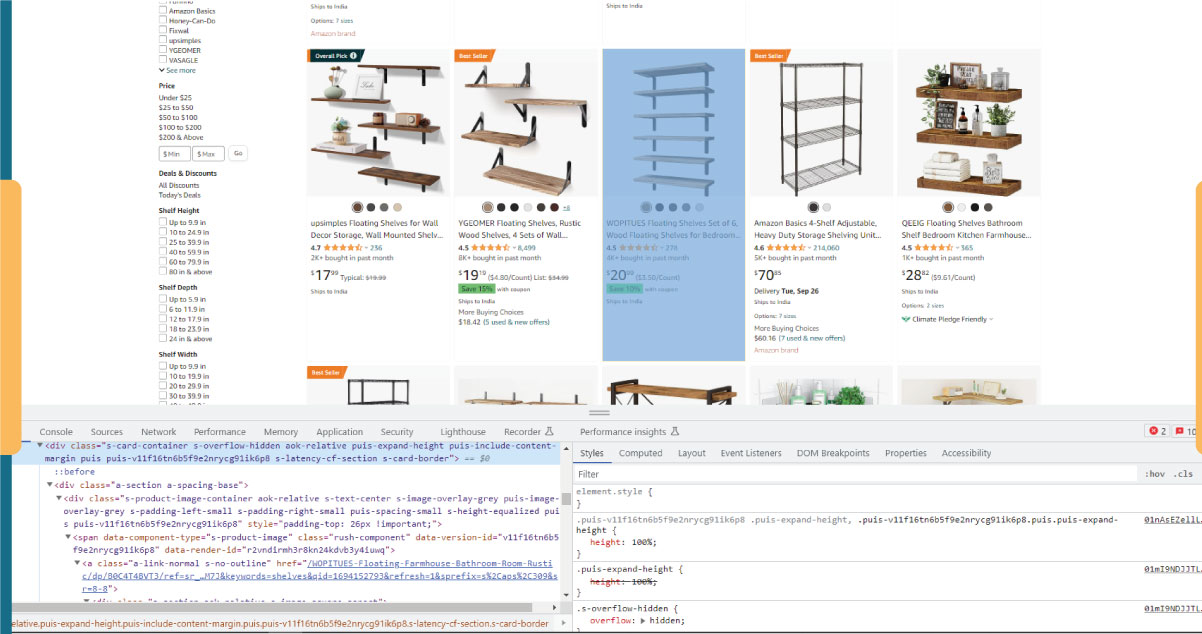
As illustrated in the screenshot above, the containers housing all the data possess the following class names:
sg-col-4-of-12 s-result-item s-asin sg-col-4-of-16 sg-col sg-col-4-of-20In the subsequent step, we will employ Cheerio to target all the elements containing the data we require.
RETRIEVING THE DATA
Now that we have successfully installed all the dependencies above, let's create a new "index.js" file and input the following lines of code:
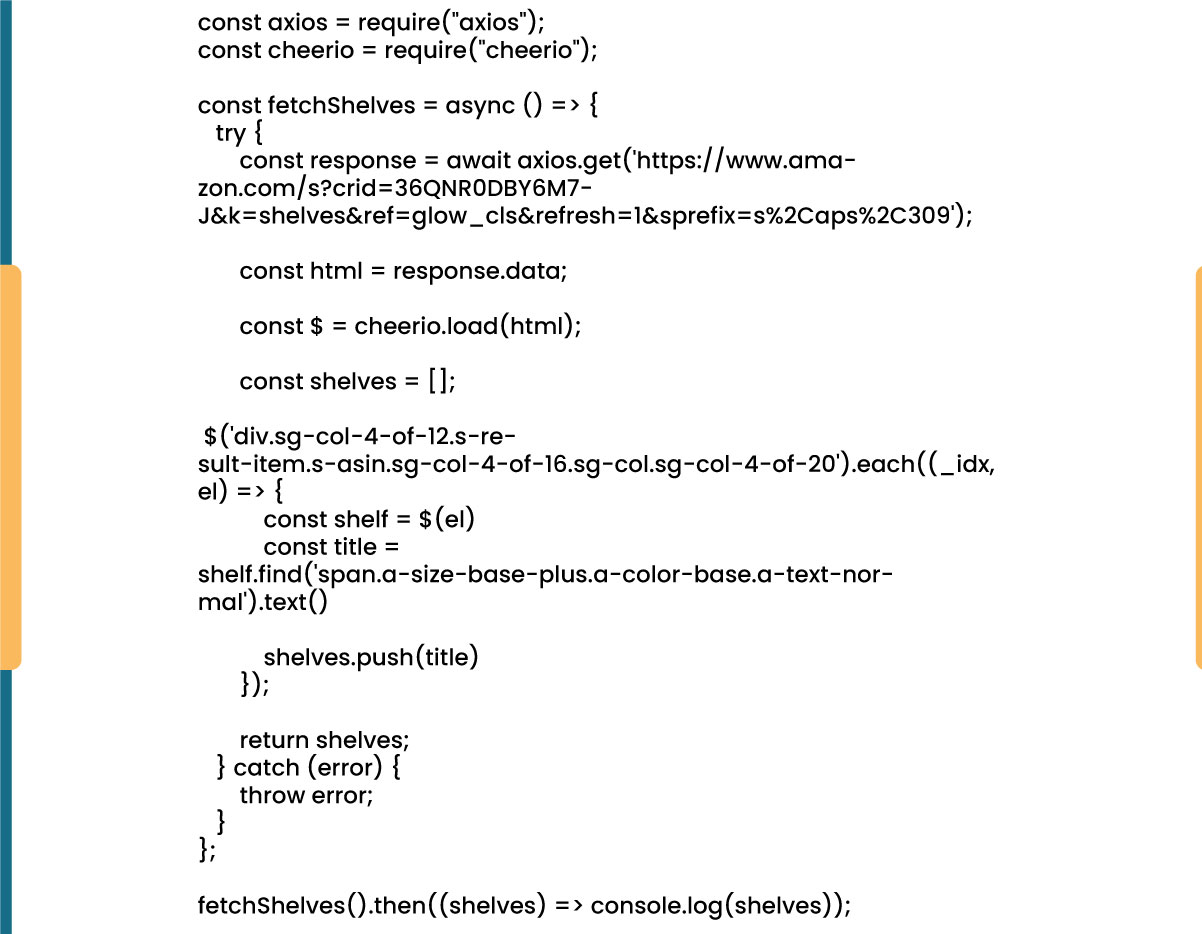
As observed, we import the required dependencies in the first two lines. Subsequently, we establish a fetchShelves() function, which utilizes Cheerio to extract all elements containing information about our products from the page. It iterates through each of them, appending them to an empty array to achieve a more structured outcome.
Currently, the fetchShelves() function solely returns the product's title. Let's proceed to acquire the remaining essential information. Please append the following lines of code after the line where we've defined the title variable:
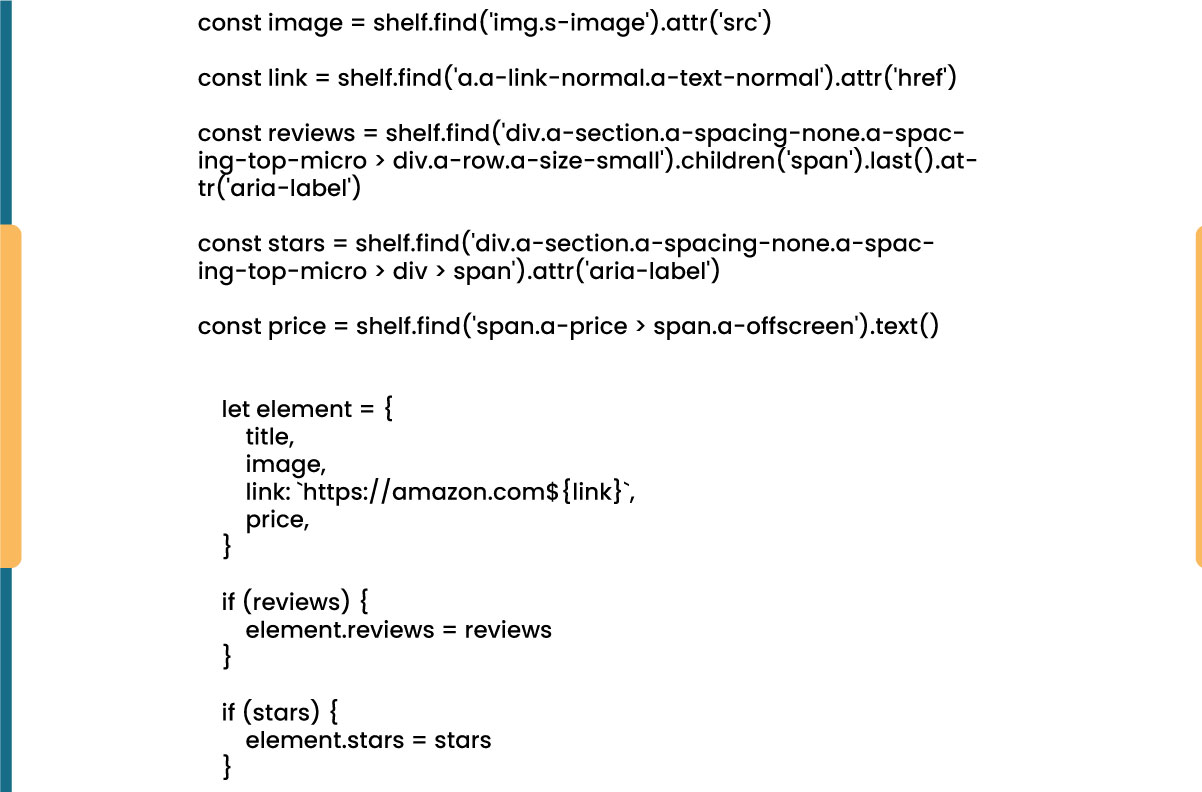
Please substitute shelves.push(title) using shelves.push(element) to encompass all the pertinent information.
We are now successfully selecting all the essential data and appending it to a new object named element. Each element is subsequently added to the shelves array, resulting in a collection of objects that exclusively contain the desired data.
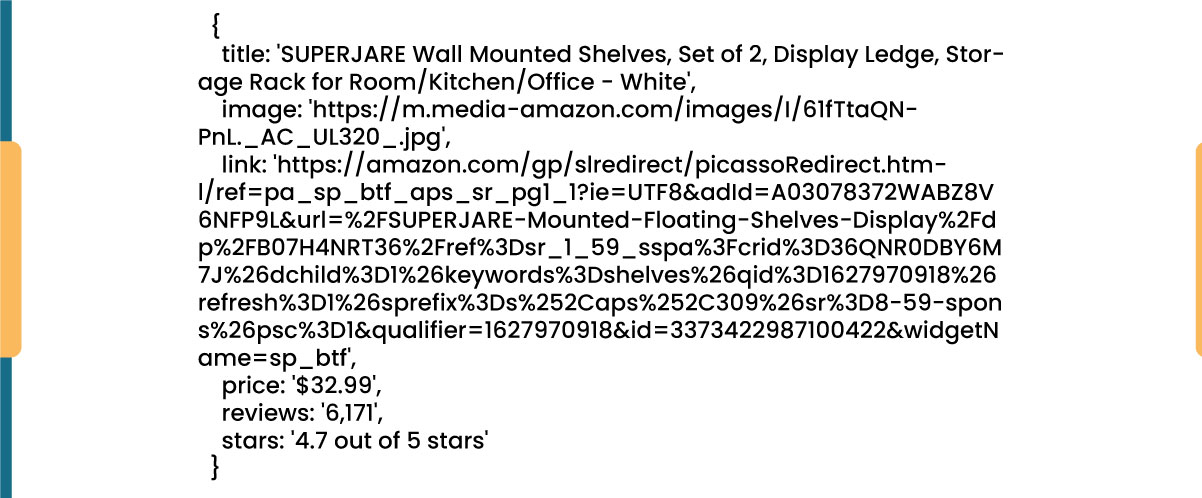
Here's an example of how a shelf object should be structured before it is incorporated into our list:
FORMATTING THE DATA
Having successfully retrieved the desired data, saving it as a .CSV file is prudent to enhance its readability. Once we've collected all the data, we'll employ the Node.js-provided fs module to create a new file named "saved-shelves.csv" within the project's folder.
To get started, please import the fs module at the top of your file and include the following lines of code:

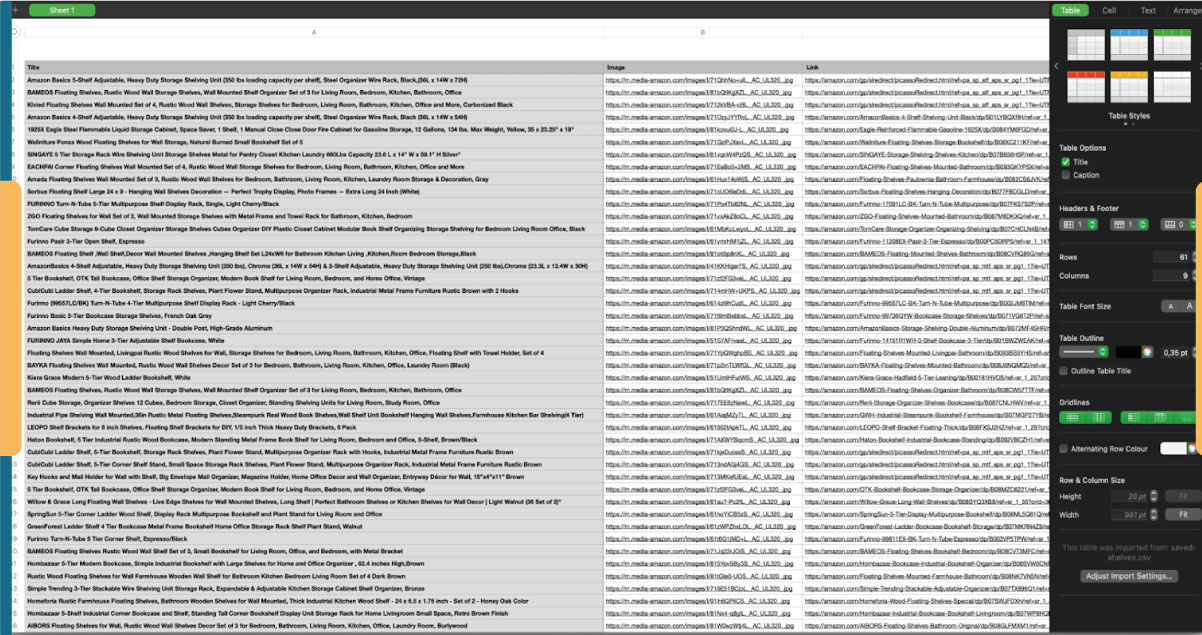
Indeed, as depicted in the initial three lines, we format the data we collected earlier by concatenating all the values within a shelf object, separated by commas. Utilizing the fs module, we generate a file named "saved-shelves.csv," insert a new row comprising the column headers, incorporate the freshly formatted data, and implement a callback function to manage potential errors.
The end outcome should resemble something along these lines:
Bonus Tips: Scraping Single Page Applications
As websites increasingly adopt dynamic content as the standard, our task of scraping data becomes more challenging due to the complexity of modern web pages. Developers often employ various mechanisms to load dynamic content, complicating the scraping process. If you need to become more familiar with this concept, think of it as trying to navigate a browser without a graphical user interface.
However, there's a solution: ✨Puppeteer✨, the magical Node library that provides a high-level API for controlling a Chrome instance via the DevTools Protocol. Despite lacking a traditional browser interface, Puppeteer offers the same functionality and can be programmatically controlled with just a few lines of code. Let's explore how it works.
In your previously created project, begin by installing the Puppeteer library with the command npm install puppeteer. Next, create a new file named puppeteer.js and either copy or write the following lines of code:
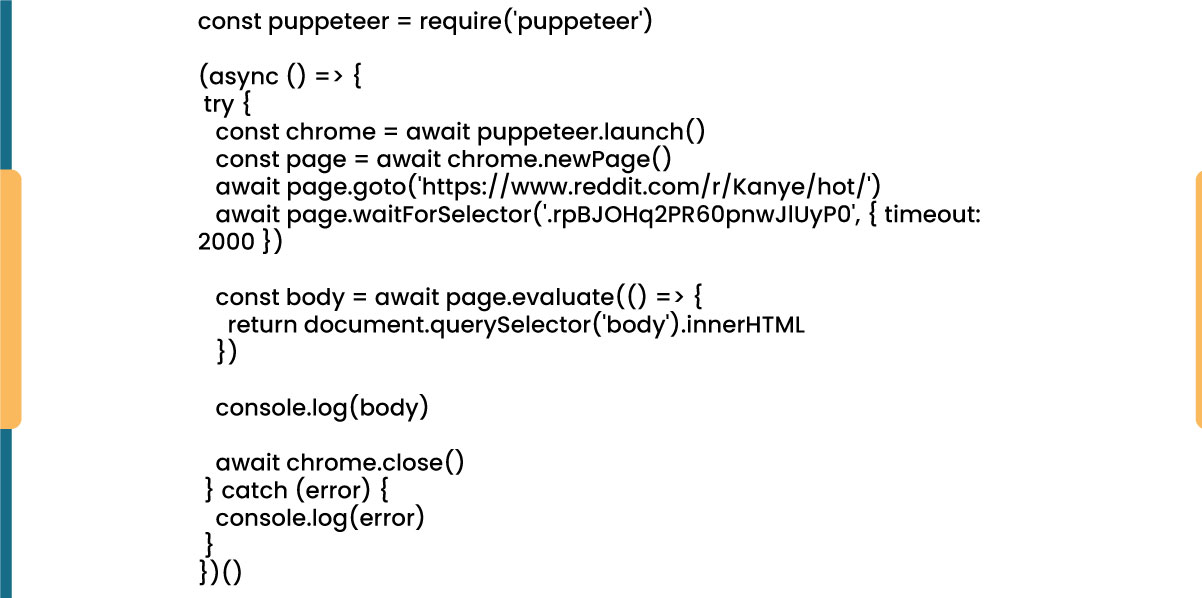
In the example provided, we kickstart a Chrome instance and establish a fresh browser page, directing it to a specific URL. Following this, we command the headless browser to wait for the appearance of an element with the class rpBJOHq2PR60pnwJlUyP0 on the page. Additionally, we specify a timeout duration of 2000 milliseconds, determining how long the browser should patiently await the complete page load.
By utilizing the evaluate method on the page variable, we instruct Puppeteer to execute JavaScript code within the context of the page right after identifying the specified element. This strategic move grants us access to the HTML content of the page, allowing us to extract the page's body as the resulting output. Finally, we gracefully conclude our task by closing the Chrome instance through the close method called on the browser variable.
This meticulous process yields a result encompassing all dynamically generated HTML code, showcasing the prowess of Puppeteer in handling dynamic HTML content loading.
For those who might find Puppeteer challenging to work with, it's worth noting that alternative tools are available, including NightwatchJS, NightmareJS, or CasperJS. While they may possess minor differences, the overarching procedure remains relatively consistent.
SETTING USER-AGENT HEADERS
The "user-agent" is a crucial request header that provides the website you're visiting with information about your browser and operating system. It essentially informs the website about your client configuration. While this information is used to optimize content for your specific setup, websites also rely on it to identify potentially suspicious behavior, especially when they detect a high volume of requests, even if the IP address changes.
Here's an example of what a "user-agent" header typically looks like:

Setting an appropriate "user-agent" header in your HTTP requests can be essential when web scraping, as it helps you mimic a legitimate browser and reduce the chances of being identified as a bot. This, in turn, helps you avoid IP bans and access restrictions on websites you're scraping.
ROTATING USER-AGENT HEADERS
To minimize the risk of detection and blocking, it's advisable to regularly change your "user-agent" header. It's essential to avoid sending an empty or outdated header because this behavior would be atypical for an ordinary user and could raise suspicion.
RATE LIMITING
While web scrapers are capable of swiftly gathering content, it's crucial to exercise restraint and not operate at maximum speed for two important reasons:
Excessive requests in a short timeframe can overload a website's server, potentially causing it to slow down or even crash. This can disrupt the website's service for both the owner and other legitimate visitors, essentially resembling a Denial of Service (DoS) attack.
In the absence of rotating proxies, sending a high volume of requests per second is a clear indication of automated bot activity, as humans wouldn't typically generate hundreds or thousands of requests in such rapid succession.
The solution to these issues is to implement a delay between your requests, a practice referred to as "rate limiting." Fortunately, rate limiting is relatively straightforward to implement.
In the Puppeteer example provided earlier, right before creating the body variable, you can use Puppeteer's waitForTimeout method to introduce a pause of a few seconds before initiating another request:
This simple delay mechanism helps you avoid overloading the website's server and prevents your scraping activity from standing out as automated and potentially disruptive.
await page.waitForTimeout(3000);Certainly, if you wish to implement a similar rate-limiting mechanism for an Axios-based example, you can create a promise that utilizes the setTimeout() method to introduce the desired delay in milliseconds. Here's how you can achieve this:

In this code snippet, the delay function returns a promise that resolves after the specified number of milliseconds. You can then await this promise in your Axios-based web scraping logic to introduce the desired delay between requests, similar to what we did with Puppeteer's waitForTimeout method.
By employing these rate-limiting techniques, you can prevent excessive strain on the target server and emulate a more human-like approach to web scraping.
Closing Thoughts
So, there you have it—a comprehensive, step-by-step guide to constructing your web scraper for Amazon product data! However, it's crucial to acknowledge that this was tailored to a specific scenario. You must adjust your approach to obtain meaningful results if you intend to scrape a different website. Each website may present unique challenges and intricacies, so adaptability and problem-solving are essential to successful web scraping endeavors. For more details about building an Amazon product scraper, contact Real Data API now!


.webp)


